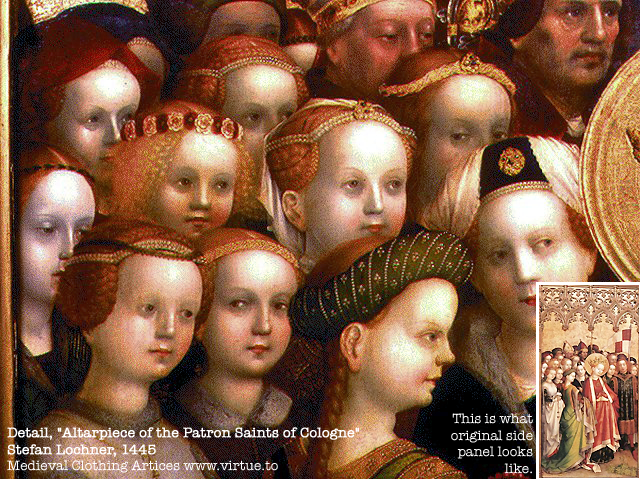
I hardly need detail the uses of braids! Whether want to braid long hair, or wish to braid cords, belts, flower crowns, or other things, braiding is very useful. As you can see from the pictures of medieval illustrations, braids have been used for adornment and utility for centuries.
Be sure to look up resources for "finger loop braiding" if you want ornamental non-hair braids. It is an unusual yet very medieval decorative braid method.
I have not found any good pictures of men wearing braids, but I understand that there were cultures during our period where this was not unknown. At any rate, in the modern world, it's very useful for men, as well as women, to braid their hair; not only does it keep the hair out of food and fires, but it cuts down on tangles while sleeping. And it looks good!
If you have difficulty braiding hair, use pieces of yarn or rope until you master the basic patterns.
 For
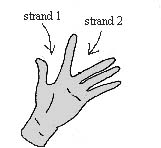
those new to braiding, the biggest question is: how do you hold three
strands
with only two hands? The answer is that you hold two of the strands in
one hand and one strand in the other. As you braid, the `extra' strand
is passed between the hands. It's hard to describe in text; have
a friend demonstrate. See the hand illustration in the 4-braid
section, also.
For
those new to braiding, the biggest question is: how do you hold three
strands
with only two hands? The answer is that you hold two of the strands in
one hand and one strand in the other. As you braid, the `extra' strand
is passed between the hands. It's hard to describe in text; have
a friend demonstrate. See the hand illustration in the 4-braid
section, also.
Obviously, the problem of strands versus number of hands is
increased;
you need to be well-grounded in 3-strand technique in order to do a
good
4-braid in hair. In addition, 4-braids have a tendency to rotate/twist
along their center axis like macrame. It seems as if odd-numbered
strands
do not have this problem. Keeping the tension even is the best
solution--but
a twisted 4-braid is also a cool thing! 4-Braid (or more) is also very
useful for making bread; it produces a fancy loaf with
minimal effort.
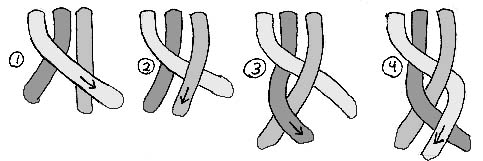
There are two main ways of conceptualizing the 4-braid; the twist-and-cross method, and the weaving method. Twist-and-cross is the easiest version to use on your own hair. The other is the easiest to start learning. Both produce similar results.
Once you are holding the hair this way, rotate your hands to the left so that the left palm is facing you and the right palm is away from you. You now have two sets of identically crossed strands.
Using a complex shifting motion which you'll just have to practice to get correct, cross the strand that is now second from the left OVER the strand that is second from the right. After that, shift your hands so that they are holding the strands in the same palm down, palm up position as at the start. Repeat from above. The diagram without hands shows the pattern that the strands should follow as you go through this maneuver.
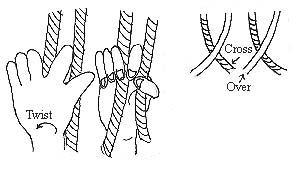
The mnemonic for this process is TWIST (rotate hands left) and CROSS
(Cross center left strand over center right strand.) Memorize this and
just repeat "Twist and Cross, Twist and Cross..." as you braid, and you
should do fine.

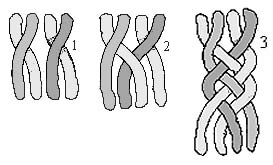
Take the left strand and weave it over and under and over the other four strands. Even out the tension. Take the new left-most strand and do exactly the same thing, including the former left-most strand (now on the right) in the weave. Repeat the process until you reach the end of the hair.
The best results are obtained by treating the new material as if it
were one strand of your braid; in a three-strand braid, this would mean
two strands of hair and one of ribbon or pearls. If you're using pearls, you can
use a single strand of pearls, or you can use several strands to get a
thicker
effect. Ribbons and thongs usually look best if there's just one of
them.
Remember to keep the tension even between the hair and the ribbon!
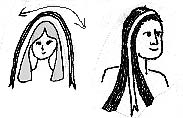 The
easiest way to braid a ribbon into your hair for two braids, such as to go under a hat: Measure a length
of ribbon that is as long as your hair--start at one end of your
loose-hanging
hair, go up over your head, and back down to the end of your hair on
the
other side. (See the drawing.)
The
easiest way to braid a ribbon into your hair for two braids, such as to go under a hat: Measure a length
of ribbon that is as long as your hair--start at one end of your
loose-hanging
hair, go up over your head, and back down to the end of your hair on
the
other side. (See the drawing.)
Separate your hair into two sections; left and right. Use a bobby pin to anchor the ribbon at the top of your head so that one end hangs down on the left, and one end hangs down on the right. Start braiding on one side, using the ribbon as one strand and the hair as the other two. When the first side is finished, braid the other side.
To finish, wrap the extra ribbon around the bottom of the braid and tie it off. If you would like more security, use an elastic and then cover the elastic with extra ribbon. This style will result in two braids and a ribbon that goes over the top of your head, which looks kinda nice, or can be covered by a hat.
 For
single braids, or braids without the ribbon going over the top of your
head, you can start the braid in the following manner. This is also the
easiest way to make a braid and tie it off without elastics. Take a
length
of ribbon twice as long as the hair you are going to braid. Tie it
snugly,
with a half-knot, around the hair. Separate the hair into two sections;
begin braiding. After making about three crossovers, make sure the
ribbon
is still tied fairly tightly at the top. Continue braiding to where you
want to stop. Wind one of the two ends of ribbon clockwise around the
braid,
and wind the other one counter-clockwise. Tie off.
For
single braids, or braids without the ribbon going over the top of your
head, you can start the braid in the following manner. This is also the
easiest way to make a braid and tie it off without elastics. Take a
length
of ribbon twice as long as the hair you are going to braid. Tie it
snugly,
with a half-knot, around the hair. Separate the hair into two sections;
begin braiding. After making about three crossovers, make sure the
ribbon
is still tied fairly tightly at the top. Continue braiding to where you
want to stop. Wind one of the two ends of ribbon clockwise around the
braid,
and wind the other one counter-clockwise. Tie off.
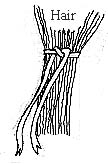
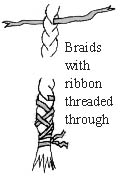 If
you are wearing medieval braid cases, or just want to tie off your braids
without
elastic, thread a piece of ribbon straight through the finished braid.
Crisscross the ribbon down the braid for about 3" or more (or over the
outside of the braid casing), and finish by wrapping the ends in
opposite
directions around the braid and tying it off.
Some people think that braid cases are a bit dubious from a solid history point of view; do a hunt
for articles if you're interested in the issue.
If
you are wearing medieval braid cases, or just want to tie off your braids
without
elastic, thread a piece of ribbon straight through the finished braid.
Crisscross the ribbon down the braid for about 3" or more (or over the
outside of the braid casing), and finish by wrapping the ends in
opposite
directions around the braid and tying it off.
Some people think that braid cases are a bit dubious from a solid history point of view; do a hunt
for articles if you're interested in the issue. Here is an illustration of how the braid in process will look; I won't
diagram the process, as it is fairly easy once you have the basic
3-strand
braid technique. The important point is to keep the ribbon flat and
loose. Another option for the Duchess is Italian Hair
Taping.
Here is an illustration of how the braid in process will look; I won't
diagram the process, as it is fairly easy once you have the basic
3-strand
braid technique. The important point is to keep the ribbon flat and
loose. Another option for the Duchess is Italian Hair
Taping.
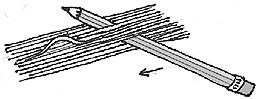 Particularly
if you are new to putting your hair up, or if you are putting it up
higher
on your head than usual, there may be little "loopy sticky up bits,"
slubs
or cow-licks (call them what you will) that interrupt the smooth
surface
of the hair before it gets to the braid. Sometimes these won't go away,
no matter how much you comb the hair. In this case, you can hide them
by
using a tool such as a pencil or a hairstick. Slide the hairstick into
your hair, tangential to your head, an inch or two in front of the
slub.
Gently pass the hairstick backwards over the slub; the top hair will be
smoothed over the slub and hide it.
Particularly
if you are new to putting your hair up, or if you are putting it up
higher
on your head than usual, there may be little "loopy sticky up bits,"
slubs
or cow-licks (call them what you will) that interrupt the smooth
surface
of the hair before it gets to the braid. Sometimes these won't go away,
no matter how much you comb the hair. In this case, you can hide them
by
using a tool such as a pencil or a hairstick. Slide the hairstick into
your hair, tangential to your head, an inch or two in front of the
slub.
Gently pass the hairstick backwards over the slub; the top hair will be
smoothed over the slub and hide it.
 When you're braiding, you should think about the final effect you wish
to achieve; will the ends be tucked up out of sight, or will they be
hanging
free? If they will be in sight, you should remember that the free end
of
a braid is basically an ornamental tassel--it's part of the whole
effect.
As such, my advice is to leave 1-3 unbraided inches at the end of a
braid.
Not only does it look nicer, but it also makes it far less likely that
the ties will slip off the end. If your hair is healthy (as much as an
unliving thing can be healthy!) the ends will all end up at mostly the
same length, further contributing to the effect of a luxurious tassel.
When you're braiding, you should think about the final effect you wish
to achieve; will the ends be tucked up out of sight, or will they be
hanging
free? If they will be in sight, you should remember that the free end
of
a braid is basically an ornamental tassel--it's part of the whole
effect.
As such, my advice is to leave 1-3 unbraided inches at the end of a
braid.
Not only does it look nicer, but it also makes it far less likely that
the ties will slip off the end. If your hair is healthy (as much as an
unliving thing can be healthy!) the ends will all end up at mostly the
same length, further contributing to the effect of a luxurious tassel.
I have not covered any of the French Braid variants here, because I
have not encountered any period pictures of braids that look as if they
are of the French braid type. If you have seen French braids in
medieval
pictures, I'd love to get a photocopy of the picture, and then I can
teach
it around!
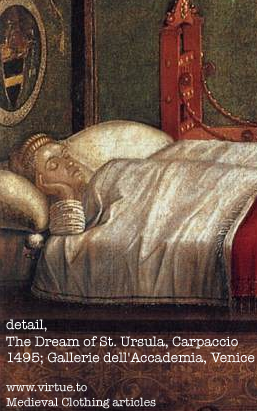
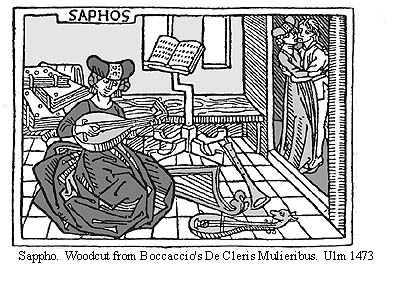
Sappho, here, is wearing some kind of braided buns over her ears and under her padded roll hat.
| All material © 1999-2011 Cynthia Virtue | Frequently Asked Questions |
| Back to Virtue Ventures Main Page | Back to Article Index |
If you're interested in historical braids or research, feel free to drop me a note. Email Author with comments