unicorn windowHow to make a fake medieval Stained Glass window
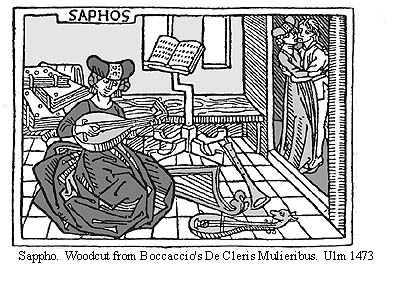

by Cynthia du Pré Argent
© 2005 Cynthia Virtue

Note: I will have accompanying step-by-step photos when I get around to making my next one.

Supplies needed:

The instructions that Plaid publishes (and their video) talk about doing this directly on the windows, but I find that the acrylic panel makes it much easier to work with, you can move the design to different windows or houses, and you don't get as many mistakes.

Preparation:

If you're of an artistic bent, you can just forge ahead and draw your design on the blue plastic film that covers the acrylic.  (Draw it on one side, of course, and the other side will be peeled off to be your working side.  If you get lexan, it usually has an opaque protective film, so you'd have to peel it completely and use the tape-on-the-design method below.)

However, if you're not artistic, if's a good idea to use an already-existing design, and one which can be simplified into some shapes that will be relatively easy to draw.

A good starting point is medieval woodcuts, which are already basically line art, or a book such as Dover's Medieval Tapestries Coloring Book.

Woodcut of Sappho playing luteIn the woodcut example to the right, you could do the whole image, or just use the lady playing the lute, with a tile floor for some perspective and added color.

You could also have a design which is just textured glass, perhaps with your arms in the center.  This sort of thing is excellent for enhancing privacy and atmosphere.  See the example at the bottom of the page.

This is a good time to mention:

Making your pattern look like stained glass:

The best way for you to do this is to study a stained glass manual (check the library,) but the basic principles are not difficult.

Keep in mind that glass is rigid and fragile.  This means, for example, that you can't easily cut an inside curve, such as trimming out the inside of a letter C, or the inside of an L.  The glass would fracture unless the curve were very gentle.  A curve like that has to be made of many sections, each with its leading supporting it.  If you wanted to have a letter C, or other curve in your fake stained glass, draw the C, and then break it up into smaller sections with nearly straight  edges or angles.  I usually add the segmentation after I've drawn all the main design elements on the acrylic with the liquid leading, but you could do it at any stage of the design process.

Likewise, large sections of color should be broken up into manageable segments of "glass", even if it's the same color over a wide area.  Slight changes in the color can make it look more "old timey," such as the different shades I used in the rabbit hill.

Medieval stained glass used fairly simple colors, and the glass was not shaded.  In recent centuries, glass makers have made glass that might be green at one edge and shade to blue at the other.  A stained glass worker could use this color change as part of the design; you see this in Tiffany style windows.  A medieval work would likely be more like a mosaic of glass.  Faces and other line detail were painted on.  The pieces of glass were held together with shaped lead strips, called "cames" which are soldered together.  Cames aren't very strong, so a large piece will have supporting metal strutwork.

If you have the time, examine real stained glass windows.  Sitting in church contemplating the windows will give an impression of deep devotion, but you might just be checking their construction!  Look at medieval stained glass via the web or art books.  Here's one great site:  but a Google search on "medieval stained glass" will bring up many sites to check out.  Don't forget a Google Image Search, too!

For my own projects, I'm content to have medievalish images, which are broken up by leading lines so that they seem more like real stained glass. I don't have as many leading lines as a real window would need to use, but there's no reason not to be more precise with it.  I also use shading within the glass sometimes, such as the leaves on the tree above the rabbits, or their white bellies and feet.

Drawing the design draft (not working with the goop yet)

Make a margin box on your acrylic's blue plastic film.  One-quarter inch to half an inch is good for a small piece, one inch is about right for a large window-sized piece.  If the frames of your windows are larger than that, make at least the bottom margin big enough so that the design will be above the frame and in front of the glass itself, or else it will look odd -- see my notes next to the example pictures.

Inside of the margin, you may wish for a decorative border of smaller "panes."  I usually do these about half an inch to an inch wide, and subdivide them unevenly so that they form a run of rectangles of different lengths.  I've noticed that "real" stained glass often has this feature.

Finish drawing the design on the blue film.  If you make a mistake, just ignore it and remember to follow the corrected line when you get to the goop stage.  If you make a big mistake, note that you have a layer of film on each side of the acrylic; just use the other side.  If you're not confident of your ability to do it in two tries, draw your design on a large piece of paper instead, until you have it right.  Then you can either transfer it to the film or just tape the design onto your acrylic.  Photocopy enlargement is another option.

When you have your design all set, take the film off the side you're going to put the goop on, leaving your design on the other side.  This will create a significant static charge on the acrylic.  Wipe the acrylic down with a damp washcloth and let it dry; that should remove most of the static.

You're ready to start with the goop.  I mean, the leading.rabbits - see discussion below

If you have the large size bottle of leading, cut only a small opening at the tip.  If you cut too large, you can't make the right size line, and it's always easier to cut a small hole and enlarge it than the other way around.  I usually end up with a leading line about 1/8" wide, but that comes out of a hole half that size.  Experiment.

Practice making a few lines on a piece of paper.  Hold the tip of the bottle perhaps a quarter-inch above the surface and let the stuff fall down onto the surface.  This will make a slightly domed line in cross section.   Squeezing the bottle evenly is one of the major tricks to this craft, but with care, you can go back over flat or inadequate sections and add a little more.

Start by outlining your margin box on the acrylic, following the lines on the design which is on the film or the paper on the other side of the panel.  This is a good opportunity to become familiar with the process, to get your mind in the groove and all that.

For a sharp corner, stop squeezing the goop, and let it end itself.  If you get a little pointy tail where you don't want it, just ignore it and keep going.  Any mistakes can be fixed when the leading is dry -- take a sharp knife, separate the mistake from the rest of the line by cutting down gently, as if into a piece of cake, then peel off the offending dried stuff with your fingernail.  Be careful with the knife, as soft acrylic will scratch fairly easily.

Sometimes you'll get a mistake because of static electricity interfering with the flow.  Sometimes this will happen if you're making a line closely parallel to one you've already laid down.  Just keep drawing with the leading and correct it later as usual.

Keep drawing your leading lines until your design is all outlined.

If there are faces, you can draw those lines in with leading, too, before filling with color.  It might take some practice, and you can always do a little "surgery" with a knife on the edges as if you were correcting a mistake, to make it look right.  You can also do several faces on a different surface, (shiny aluminum foil, a plastic plate, or saran wrap) let them dry, and transfer the best one to your project by peeling them up with a fingernail.  For the lady, above, I drew several noses and mouths in the margin area on the same piece of acrylic, and used the ones I liked best.  The surrounding color goop will adhere it down with no problem.

Let it dry overnight.

No, really, overnight, where the cats can't get to it, where it can be flat/horizontal, and undisturbed.  Yes, you may gaze at it adoringly every so often, but it's essential that it be fully dry before you put the color panels in.

Colored sections which mimic glass:

The hard part is over!  Now you're just coloring, like in a coloring book.  Except stickier.  Which reminds me: all this goop stains fabric.  Roll up your sleeves and wear junky clothes.

Lay down color inside of each leading section, but not too thick.  On your first project, this is where you discover how much goop you need.  I would estimate that it's about 1/16 of an inch thick when wet, and maybe half that after drying, but I've never measured it.  If it's too thick, it won't dry evenly, or even, at all, if the damp stuff becomes sealed inside of a solidly dry film.

The finesse points here are:

Lay down a slightly thicker bead of clear or color goop at the edges of the black leading.  It's important for it to bond with the leading or else you get a peculiar broken look to your pieces where you have 'color holes' alongside.  Once you're sure that the goop is sticking to the sides of the leading, you can smooth this out a bit.

Don't lay the color down solidly, goop line edge-on-ege, because it will be too thick.  Maybe draw parallel lines or loops or something, and use the back of a spoon to spread it around.  You can add more if it seems too thin.

Don't try and do textures with the nozzle of the applicator; this will introduce air bubbles.  Use some other tool to make textures or blend colors.  The various ends of silverware work well for this sort of thing; be creative.  Forks, handles, combs... Bubbles can be burst with a toothpick.

You can fill in a few sections (between the leading lines) when you have time, and come back and do more later.  Don't do half a section, though, because the dried edge will be obvious. You should keep the thing horizontal until mostly dry, however, or the goop might sag a bit.

You'll know when the colored goop is dry because it will be transparent -- although there are some colors which end up only semi-transparent, such as white, metallics, and the caucasian flesh tones.

Final steps:

You can just prop your finished panel in a window, which is what I do with most of mine.  A finishing nail on each inner side of the window frame will stop it from toppling out.  You can drill holes in the corners and hang it from hooks above your windows, or if it's small, from a suction cup hook on the window.

You can do a really large one if you can find the acrylic.  I'm planning one about 4x4'.  You could do just edges of windows (directly on the glass), or suncatchers, or around mirrors.

The goop will get sticky and hazy if exposed to a lot of moisture, but I haven't had any problem yet with the one in the bathroom which is about 7' from the shower.  I think it must get slightly sticky, though, because there's some dust and fuzz lightly stuck to it, which I didn't notice until I moved it to take photos.  It's possible that a layer of sealant spray or polyurethane would protect it.

I haven't noticed any color fading yet; it's been 4 years for my oldest one.

Other variations:

I tried using those half-round glass lumps sold various places as additional color/texture.  It doesn't work trying to surround the thing with the black leading; it bleeds under the lump and doesn't look good.  It's possible that making a circle for it with the leading, letting it dry, and then epoxying the lump onto the acrylic would work.

Several groups use these panels for decoration in their medieval encampments.  The likelihood of a medieval person bringing a leaded glass window with them on campaign is pretty low, but they sure do look nice.

You can make small panels like this to go around a candle-lantern, or your dining room chandelier.  Might be best to use real glass, and be sure the goop is on the outside!  I don't know if it's flammable.

Plaid sells instructional videos and booklets, but I didn't find them very useful.

Examples:

Close up of rabbit window
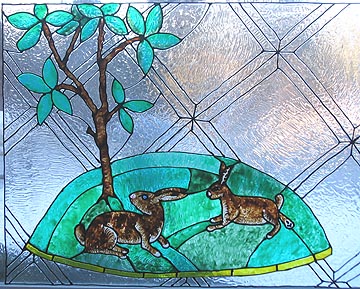
Things to notice:  The rabbits look fairly dark here, and there's an overall blue cast, but that's 
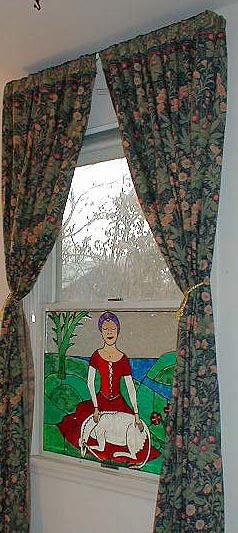
because I took the photo looking east at sunset.

Notice the different segments in the hill, with three different greens.  The gold border is an element taken from the red Cluny "mon seul desir" tapestries, which is where I got the rabbits.  If this were a real glass window, the rabbits would be assembled in many sections.

The mullioning (diamond window effect) is off plumb.  I though a preprinted logo of the plastic company was on the square and used that instead of making my own marks!

This was a companion piece to the lady and unicorn above -- you may notice that the lady's tree seems rather truncated.  That's because I was going to make another panel for the top of that window with the tree in flower, but never got around to it.
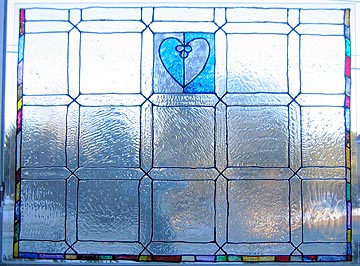
Mostly clear window panel
Here's one with a paned glass effect sourced from Black Adder -- the windows in the Queen's audience chamber!

These are simple to make, really.  All the narrow clear strips of glass are exactly the width of my yardstick.  Do that in a grid, centered side-to-side.  Be sure that the spaces between are squares -- looks better.  Then just draw an X at the intersections.

You can see there are a variety of texture effects in the square segments.  The lower right is quite smooth, others are striped, or furry, or curly.

It's an artistic choice you can make if you want to border the top of your panel or not.  You see my colored bits don't go across the top; it was a sash window and I decided it would look too "heavy" to have a border right in the middle (the top portion was just glass.)  I think I might choose otherwise next time.

I tried a mullioned look with colored panes also (not pictured) -- I found I disliked it; it reminded me of a cheesy bar-and-grill.  The clear-all-over lets you see the colors of the outside.

I've done modern designs with this stuff for my Sister's and Mother's bathrooms.  You can get really wild, or match the design elements in their wallpaper, or whatever.

Final note: if you feel hopeless about being able to do this, you could consider having a copy center make a color photocopy of a medieval stained glass window onto an overhead transparency.  But big panels will look better, I think!  There is also a company which makes vinyl stained glass panels which stick onto your glass with just water, but they don't have any medieval designs.

© 2005 Cynthia Virtue
Back to the Medieval Home Companion

Support the website, please!