 A:
The body piece forms the front and back of the main part of the tunic.
A:
The body piece forms the front and back of the main part of the tunic.
Thanks are extended to Mistress Tangwystl of the West, whose class
on period clothing techniques has inspired me to spread the word.
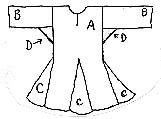
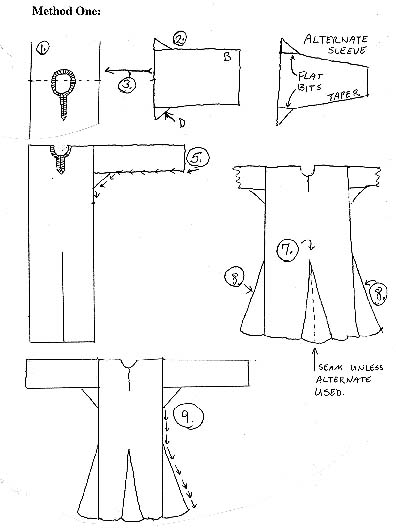
These are the pieces of your tunic.
Think about how they go together in this drawing of the finished tunic.
A:
The body piece forms the front and back of the main part of the tunic.
B: Sleeves (rectangular or tapered toward the wrist)
C: Gores: triangular pieces of fabric that give room to move in the
"skirt" of the tunic. The more movement you want, the wider they should
be at the bottom. 11" is good for a knee-length tunic; twice that for
floor
length. These are the same fabric as the rest of the garment.
D: Gusset: square pieces of material that give ease at the underarm.
These are the same fabric as the rest of the garment.
How much fabric do I need?
Once you take your measurements, you will be able to figure this out. If we assume 48" wide fabric, (cotton broadcloth, for example,) and that you are not more than 40" around your body, and your garment is not going to be longer than 60" (this would be floor length on a shortish woman or knee length on a tall man), then 4 yards will be plenty, with room for gores, sleeves, etc.
The easy way to figure this is double the length that you want your garment to be, as long as * of your circumference leaves at least 20" of fabric width. You can get this down to less fabric if you graph it out carefully.
Note that the tunic should be made out of all the same fabric; gores, sleeves, etc, should match the body.
Take (and write down) the following measurements:
| Column A | Column B |
| 1. Head: | 3a. Chest: |
| 2. Neck: | 3b. Tummy: |
| 3. (see right): | 3c. Hips: |
| Which of these three in column B is largest? Put this measurement at #3. | |
| 4. Back of neck to wrist: | |
| 5. Upper arm circumference: | |
| 6. Hand circumference: | |
| 7. Shoulder to level where you want the slit to end: | |
| 8. Shoulder to waist: | |
| 9. Waist to hem (at side seam) | |
| 10. Shoulder to hem: |
Tunics are not closely fitted garments; you need to be able to move. Thus, if your tummy is larger than where your belt goes around, measure the tummy, not the "waist."
Step 7. The farthest point down your chest for the slit -- ie, no farther!
Now we will adjust these numbers so that we can cut out the pieces
easily. These assumptions are for adults; children's proporations
for neck vs. head measurement will result in a very long slit; you
might
want to make a wider neck instead.
These new figures include seam allowance (1/2") and "ease," i.e.,
"movement
room."
| Column A | Adjusted figures |
| 1. Head: no change | |
| 2. Neck becomes neck hole for close-fitting style: subtract 3" from circumference for seam allowance and divide by 2 -- IF you are folding over neck seam allowance. If using bias tape, do not subtract the 3". (see note below about this) | |
| 3. This becomes short dimension of body piece - see note | |
| 4. Back of neck to wrist becomes sleeve length. See note | |
| 5. Upper arm becomes sleeve width: add 1" seam and 2" ease | |
| 6. Hand diameter becomes cuff (only if sleeve is tapered) add 1" seam and any desired ease | (optional) |
| 7. Shoulder to slit end becomes slit length ? see note. | |
| 8. Shoulder to waist: no change | |
| 9. Waist to hem becomes center skirt slits: add desired hem foldover, if any. | |
| 10: Shoulder to hem becomes long dimension of body piece ? see note |
Notes:
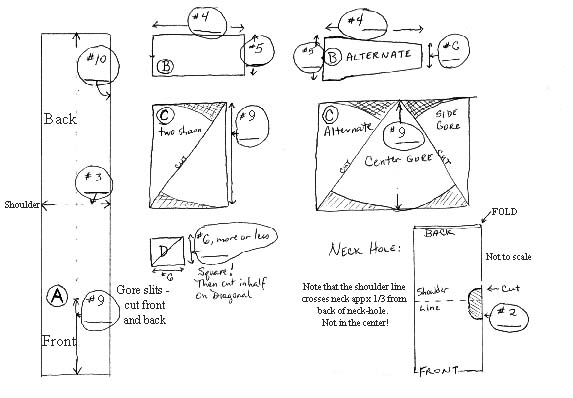
2. This may seem counter-intuitive, so stick with me. The tunic neck should lie right at the neck -- not a wide opening, but more like the neck on a crew-neck sweater. In order to achieve this with fabric, the initial cut needs to be smaller than the neck, so that as you fold back the seam allowance, you approach the right circumference. A working neck circumference that is 3" smaller than your real neck circumference is about the right amount for most people. If you're not doing some sort of folded over neck (seam or lining or facing) you don't need to make a neck opening that is smaller than your neck; make it right at your neck size.
Take #3 original measurement. Divide by two. Add 2" for "ease" & 1" for total seam allowance: This will be the "short" dimension of the body piece.
4: Neck-to-wrist: _____ Minus half of new #3: ____ Equals sleeve length:
7: The combination of the neck hole and the slit must allow your head through! Head: _____Minus neck:_____ Equals: ___. Divide this by 2 for minimum:_____ Desired slit length (your call):
10: Long body piece: Shoulder to hem: _____ Plus hem foldover: _____ Multiply by 2: _____
A digression: Two terms and a technique
 This
applies to woven fabrics, not knits. (Knit fabrics are not advised for
SCA costuming.)
This
applies to woven fabrics, not knits. (Knit fabrics are not advised for
SCA costuming.)
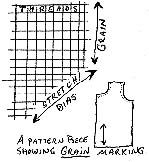
The grain of the fabric is the direction that the warp and weft threads run; they are perpendicular to each other. Fabric does not stretch much on the grain, but if you stretch it at a 45-degree angle to the grain, it stretches a lot. This angle is called the bias. When sewing these tunics, the goal is to attach bias edges of the gores to the straight-grain edges of the tunic. This prevents long-term stretching of the gores. Straight grain is often marked with a double-ended arrow.
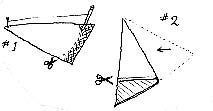 If
you cut a simple triangle, one edge will be longer than the other, or
the
edges will be longer. You need to make a "pie piece" or
"circle-section"
instead. This is actually very simple. Either (1) use a string and
chalk
to mark a curve with the top of the triangle as the pivot point, or (2)
cut your triangle (see step five) and then fold the short edge along
the
long edge and cut off the remaining bit. Fold again to approximate a
curve.
If
you cut a simple triangle, one edge will be longer than the other, or
the
edges will be longer. You need to make a "pie piece" or
"circle-section"
instead. This is actually very simple. Either (1) use a string and
chalk
to mark a curve with the top of the triangle as the pivot point, or (2)
cut your triangle (see step five) and then fold the short edge along
the
long edge and cut off the remaining bit. Fold again to approximate a
curve.
These are the separate pieces you need. Fill in the measurements
from the second table (in the circles) so you know what to cut out.
 Sewing
it all together
Sewing
it all togetherThere are two ways that you can sew it together. My preferred method is first (it is more like "normal" clothing construction), but some folks think the second method makes more sense, because everything stays flat until the very last moment.
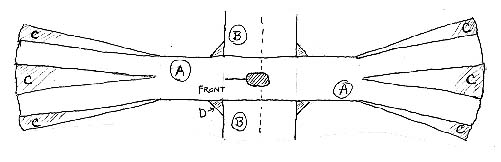
Same process, but do not do Step 5 or 9. Instead, at step 9, sew
both side seams in two fell swoops. Your garment will look like the
illustration
below until Step 9.
You're done! Really!
Don't forget to look at the other articles for how to make a hat or similar.
In the middle ages, you weren't dressed unless you have something on
your
head!
| All material © 1999-2011 Cynthia Virtue | Email Author with comments |
| Back to Virtue Ventures Main Page | Back to Article Index |