 Coifs
are great for keeping you warm at night (either while partying or
sleeping) keeping the sun off of your head during the day
(especially
if you dislike hats), and for absorbing sweat under helmets or other headwear.
Coifs
are great for keeping you warm at night (either while partying or
sleeping) keeping the sun off of your head during the day
(especially
if you dislike hats), and for absorbing sweat under helmets or other headwear.Coifs
are great for keeping you warm at night (either while partying or
sleeping) keeping the sun off of your head during the day
(especially
if you dislike hats), and for absorbing sweat under helmets or other headwear.
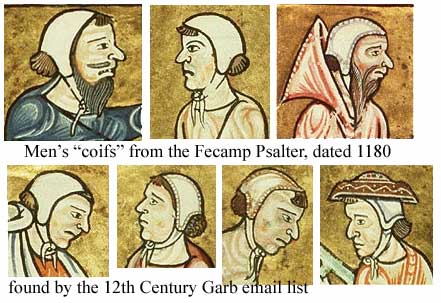
"Coif" is a general term for white linen headwear for men and women,
but it can also specifically apply to closely-fitted caps with ties, as
described here.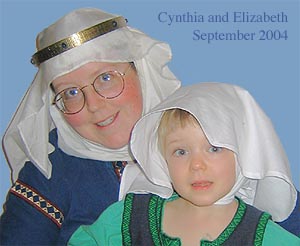
Note: this pattern is for the pre-1500 style that is one or two pieces. After 1500 (or so) the 3-piece coif (see below) became more popular, possibly as a technological/tailoring advance; this design eliminates the wrinkles at the top of the head by having a strip that runs from the forehead to the nape of the neck. This is likely the pattern for the Doge's camauro, famed in portraiture, as well; like any body-linen item it absorbed oils and dirt, preserving the expensive outer garments, while being easy to launder and bleach in the sun.
Women's coifs started becoming very structured after 1500; this page does not apply to that very interesting variation.
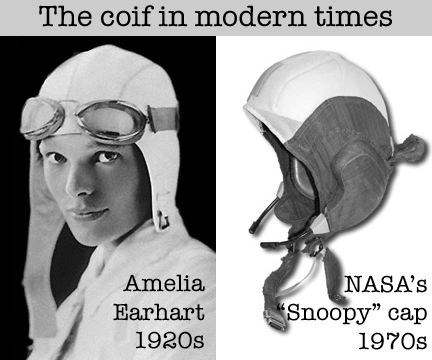
You
can see from the photo on this page that this 3-piece pattern continues
in popularity through the aviator caps of the early years of flight,
and into the Space Age.
I think that women and children probably wore these in the middle ages, but
evidence is slim. I have found them to be great for children - especially girl children who want to wear a veil like the women,
but who don't have the patience for the bands of fabric method.
My daughter is wearing a coif under her veil in the picture above.

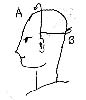 Measure:
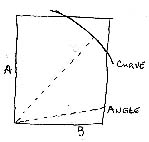
A: Over the top of your head from mid-ear to mid-ear.
B: Around the back of your head from temple to temple.
If
this is awkward for you, I have a large head for a woman and an average
head for a man, and my measurements are A: 15.75" or 40cm and B: 13.5"
or 34cm.
 Next:
Next:If you remember your algebra, think of this like graphing coordinates. Measure A is on the Y-axis: The height of your head. Measure B is on the X-axis, the width of your head.
Add about 1.5" to B (for an adult; adjust for children), and use as a radius to make a curve for the back of your head.
Some people like to cut a slight angle in the bottom so that the
area
over the ears is "lower" than at the back of the head; this is
optional.
 You
now have a pattern.
You
now have a pattern.
If you want to add a deep seam, you'll have to add more seam allowance,
but for a * inch seam, you won't need to worry.
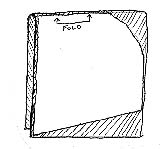
Fold your fabric.
The top of the coif should be at the fold. The face opening should be at the selvedge (woven edge of the fabric.) Using a pen or chalk, outline where you will cut. Then take the pattern away and cut it out.
Sew up the back seam. Finish any edges; add ties at the front (ear)
corners.
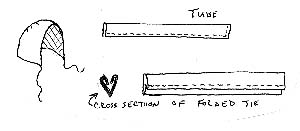 Can
be made out of ribbon (which is also useful for finishing the raw
edge,)
or of tubes of fabric turned inside out. You can also fold over fabric
so that the raw edges aren't showing, and sew it down on the outside.
Can
be made out of ribbon (which is also useful for finishing the raw
edge,)
or of tubes of fabric turned inside out. You can also fold over fabric
so that the raw edges aren't showing, and sew it down on the outside.NOTE: There will be wrinkles at the back of the head. There is no way to avoid this with the one-seam pattern demonstrated here.
You're done! This will take less than half an hour.
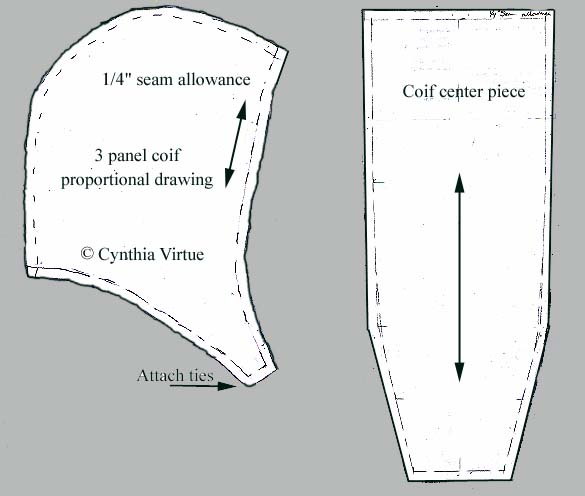 Fairly
self-explanatory; adjust the dimensions to fit your head -- if you're
not good at doing this freehand, take your measurements and enlarge
this image on a photocopier (or your own printer) to match those
measurements.
Fairly
self-explanatory; adjust the dimensions to fit your head -- if you're
not good at doing this freehand, take your measurements and enlarge
this image on a photocopier (or your own printer) to match those
measurements. 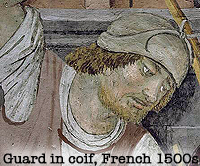
| All material © 1999-2011 Cynthia Virtue | Email Author with comments |
| Back to Virtue Ventures Main Page | Back to Article Index |