Making a "Butterfly Henin" or other Truncated-cone Type Hats of the 1400s.
by Cynthia Virtue aka Baroness Cynthia du Pré Argent
 This
article is intended as an easy-to-follow process for an average skill set;
please feel free to contact me if you have questions or would like more
documentation. These hats are a great deal of fun to wear, and will
put the finishing touch on your burgundian-style houppelande. Just
be careful going through doorways!
This
article is intended as an easy-to-follow process for an average skill set;
please feel free to contact me if you have questions or would like more
documentation. These hats are a great deal of fun to wear, and will
put the finishing touch on your burgundian-style houppelande. Just
be careful going through doorways!
One of the great sadnesses that those interested in the so-called Silly
Hats of the 1400s must deal with, is that there are no extant examples
of these hats. There are hat-related shreds of material, wires,
and so forth, but mostly we must draw conclusions from illustrations made
at the time, or read costume histories. As a result, my theories
here are, I believe, solid for an educated guess, but feel free to come
to your own conclusions and methods.
The hats, and how they were worn
 There are two related styles that I believe were constructed out of similar
materials: the pointy-cone hat (with or without veils and wings) and the
truncated-cone hat (also with or without veils and wings). Both were
stiff, covered with ornamental fabric, and held onto the head using something
other than a chin strap. When veils were worn, they were white or
cream, stiff, and usually nearly transparent. You never see the hair.
The "butterfly" type seems to be based on the truncated-cone shape, rather
than the full pointy version -- there are some illustrations where you
can see the end of the truncated cone through the veiling, but I have not
yet seen one that shows a full cone through the veils.
There are two related styles that I believe were constructed out of similar
materials: the pointy-cone hat (with or without veils and wings) and the
truncated-cone hat (also with or without veils and wings). Both were
stiff, covered with ornamental fabric, and held onto the head using something
other than a chin strap. When veils were worn, they were white or
cream, stiff, and usually nearly transparent. You never see the hair.
The "butterfly" type seems to be based on the truncated-cone shape, rather
than the full pointy version -- there are some illustrations where you
can see the end of the truncated cone through the veiling, but I have not
yet seen one that shows a full cone through the veils.
Costume historians and costume hobbyists have many theories about how
they were kept on, ranging from hatpins through hair-buns under the hat
(this is the method I use), to a special "hairband" thing that may have
been changeable from hat type to hat type. For SCA purposes, I encourage
the hatpin method; if you have short hair, you might end up needing to
use a chin strap, made as invisible as possible.
What is it made from?
 So how do you make one of these? The simplest method is based
on some reasonable "educated guesses."
So how do you make one of these? The simplest method is based
on some reasonable "educated guesses."
We know that around this time, some men wore fancy, woven straw hats
-- the Arnolfini Wedding painting by Van Eyck, 1434, shows the groom
in a black straw hat; look at the very top on a good reproduction, and
you can see the weave. Some were wearing shaped felt hats.
Van der Weyden's Portrait of a Lady from 1460 looks as if the hat is actually
some sort of uncovered basketry.
We know that these hats needed to be both stiff and lightweight.
Janet Arnold's book about Elizabethan costuming shows how many corsets
were constructed with reeds bundled up as the stiffening. Why not
use reeds for stiffening hats at an earlier age? They are lightweight,
easy to shape, easy to obtain. Most of my hats are basketry,
although stiff wool felting is another strong, light contender for material.
Using woven straw or baskets is what is generally termed "conjecturally
accurate." This means that the materials are all ones that the medieval
people had access to; they had the skills to make them; they used something
like this in other areas of life (baskets, men's hats); and there are no
examples that directly conflict with the use of the material or technique
in this way. Of course, with hats of this period, since we have exactly
Zero extant examples, it's very hard to say what they really did.
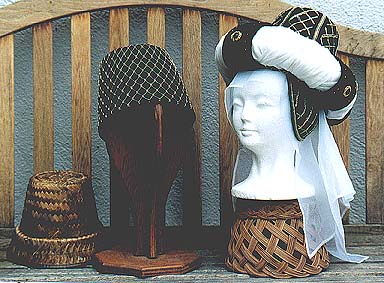
Making a truncated cone:
The great thing about this working theory is that you can get basket
or woven-straw cache-pots for houseplants in the right sizes for a
truncated-cone hat, at any garden store or at rummage sales. Using
these as a base produces a lightweight hat which will flex to your head,
and help hold itself on based on that flex. Sure, you'll get a few
odd looks, putting baskets on your head in the store, but once you get
them covered, you'll be pleased with the results.
If you go shopping for a basket in order to make this sort of hat, you
will have two types of materials to choose from. Flat grasses, woven
tightly into plant cache-pots, or thin, flexible, brown reeds, usually
in larger loops and weaves. Be certain that the size is large enough
to fit over your head at your hairline, and down the back of your head
behind your ears, and does not fall off too easily when you move your head.
It will need to be a bit loose, to give you some room for the fabric and
lining you will cover it with.
Take your basket home, take out any plastic lining that might be inside
of it. Dust it off or wash it if needed, and let dry. Mark
a line on the outside from the open side to what used to be the flat bottom
(and will now be the flat top); using this line as a position-marker, slowly
roll the basket across your covering fabric, making marks every few inches,
so that you can cut out a piece of fabric which will fit smoothly to your
hat. This will look like a thick arc of fabric. Add seam allowances,
and cut out. Also cut out a circle that is a bit larger than the
top of the hat. The covering fabric can then be sewn together in
a angled cylinder. Sew the round bit for the top of the hat to the
narrow end, so that you have a cover which will fit smoothly over your
straw basket. It can be pulled over the hat like a strangely-shaped
pillowcase, and basted to the basket, folding over the edge that will go
against your head, to the inside, so that it looks smooth. The lining
works the same way.
You may make a small black velvet loop for over your forehead if you
wish, but not all of these hats have them.
Wires and veils:
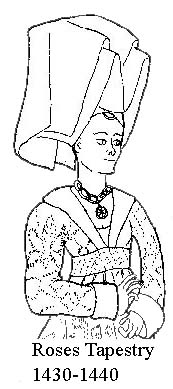
You'll notice that we cannot see any way for the veil to be supported
in the picture from the Roses Tapestry. I have a couple dozen pictures
of this sort of hat, and all of them seem to be held up by magic.
This is a darn nuisance for those of us interested in an accurate recreation!
The support may be hidden by the veiling, or left out of the pictures for
aesthetic reasons. Simple starching of the veils would not allow
the heights these rise to.
The easiest way to get this shape seems to be wires, positioned like
ant antennae. The double set of veils in the Roses Tapestry would
require two sets of these, one higher than the other. One or more
rectangular veils are folded over these in an 'M' shape, and pinned to
the wire. Some butterfly hats seem to have only one layer.
The Roses Tapestry women seem to have versions of these at least two
feet high. I would advise making a smaller one first, and putting
larger wires on after you get used to it.
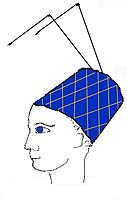 Find
a thin coat hanger, and cut off the hook and the twisted neck, and shape
it into a smooth V. Bend the "antennae" over, halfway up (see fig
2). The point of the wire V gets sewn to the flat back of the truncated
cone. A coat hanger will produce enough wire for a foot high version.
Find
a thin coat hanger, and cut off the hook and the twisted neck, and shape
it into a smooth V. Bend the "antennae" over, halfway up (see fig
2). The point of the wire V gets sewn to the flat back of the truncated
cone. A coat hanger will produce enough wire for a foot high version.
As mentioned, most veils are probably of very thin and transparent silk,
although I have heard it argued that linen can be made "nearly transparent."
Both ironed linen and natural silk can attain the stiffness shown, although
I'm not certain that linen would be able to be as stiff as silk when you
consider the yardage needed for some of the butterfly veils, because it
is heavier. Stiff polyester organza would also work, and is the best
choice if you're not somewhere that you can get silk. To get the
right shape, you can use tulle or netting -- drape it until it pleases
you, and then use it as a pattern to cut your real veil. For my rather
short version of a butterfly hat I needed a piece of thin stiff silk two
yards long and two feet wide.
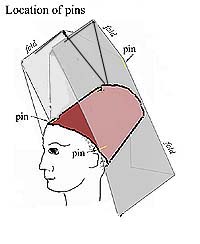 The
veil is draped over the wires, pinned down to the hat in the valley between
the wires making an "M" shape. Use a straight pin on each wire at
the bend in the wire where the fabric folds over it, to anchor the veil
to the wire. You could baste this if you prefer. A pin where
the veil touches the side of the cone, near your temples, will help keep
it stable without making it look too tensioned over the wires.
The
veil is draped over the wires, pinned down to the hat in the valley between
the wires making an "M" shape. Use a straight pin on each wire at
the bend in the wire where the fabric folds over it, to anchor the veil
to the wire. You could baste this if you prefer. A pin where
the veil touches the side of the cone, near your temples, will help keep
it stable without making it look too tensioned over the wires.
The veil will fall oddly in the back unless you put in at least one
pin to be sure the folds cover the top/back of the cone. Don't give
in to the impulse to pin it down everywhere -- it needs to have some movement,
and if the fabric is stiff, it will fall in the shapes we see in the medieval
illustrations.
Some of the thin veils appear to have either fold lines or seam lines
painted on; if you have to make your veil out of more than one piece of
fabric, that's ok. The veil itself rarely goes below the shoulder
or mid-upper-back level; all the fabric is suspended above.
Keeping it on:
My version of this hat stays on with little coercion from me.
I can take it on and off at will. However, you may want additional
security. The best idea, if you have hair at least a few inches long,
is to make a little ponytail on top of your head, braid it, and pin it
down with hairpins securely. Use the best hatpins you can find, speared
through the hat, to anchor the hat to this small bun. The hat
should stay on without the pins as you walk, but the hatpins will help
if you feel like bending or turning around. You'll want to hold the
hat if you're out in the wind -- it is like having a sail on your head.
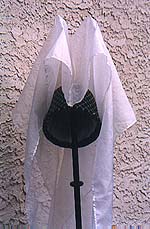
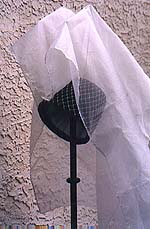
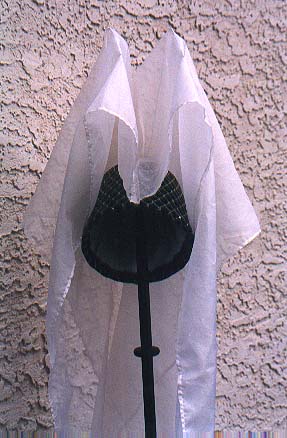
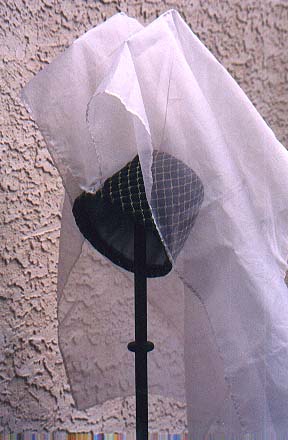
Note on the photos of my hat:
The veil should be stiffer -- this one's been through a lot without
a re-ironing. The front edges will be much straighter after an ironing.
I hope you enjoy your new fancy hat. Do feel free to contact me
at at the mail link below, or check elsewhere on my web pages for more
pictures of these most fascinating hats.
Further reading about cone hats (see the general Further Reading
page for other items):
Great illustrations of period paintings and illuminations:
Sally Fox and Belle Tuten, The Medieval Women: An Illuminated Calendar
-- multiple ISBNs, as they come out yearly. Unfortunately can not
be bought once calendar-season is over, but lots of SCA folk have them
and save them. Truncated-cone pictures can be found on these pages:
1/92, 12/92, 3/96, 6/97, 7/97, 12/97, 3/98, 6/98 -- which has a good enough
version of the Arnolfini that you can see the straw hat, 7/98, 7/99 --
this one has a ponytail coming out the *top* of the hat! , 11/00.
The medieval costuming articles on my web pages have many scans from this
source, if you do not have access to it.
For pictures, diagrams, and descriptions of some items which have been
dug up from this time (lots of fascinating stuff):
Geoff Egan and Frances Pritchard, Dress Accessories c. 1150-1450:
Medieval finds from excavations in London, ISBN 0-11-290444-0; pages
291-296 for headwear.
Reeds as used in costume, extant garments, and general techniques
for 100 years later than these hats:
Janet Arnold, Patterns of Fashion: The cut and construction of clothes
for men and women c.1560-1620, ISBN 0-333-38284-6
For an overview of this era with lots of drawings, the following book
is very useful. However, be aware that some of his conclusions seem
to be utterly unsupportable from the references for them that he gives;
before taking anyting as gospel, look up his source. With that caveat,
it's a good book to look through for inspiration before going to more narrowly-focused
sources:
Herbert Norris, Medieval Costume and Fashion, ISBN 0-486-40486-2.
Note that this is the 1999 Dover Edition, which claims to be an unabridged
version of his 1927 book Costume & Fashion, Volume 2: Senlac to
Bosworth, 1066-1485.
Go BACK to the theory page about these
hats

 There are two related styles that I believe were constructed out of similar
materials: the pointy-cone hat (with or without veils and wings) and the
truncated-cone hat (also with or without veils and wings). Both were
stiff, covered with ornamental fabric, and held onto the head using something
other than a chin strap. When veils were worn, they were white or
cream, stiff, and usually nearly transparent. You never see the hair.
The "butterfly" type seems to be based on the truncated-cone shape, rather
than the full pointy version -- there are some illustrations where you
can see the end of the truncated cone through the veiling, but I have not
yet seen one that shows a full cone through the veils.
There are two related styles that I believe were constructed out of similar
materials: the pointy-cone hat (with or without veils and wings) and the
truncated-cone hat (also with or without veils and wings). Both were
stiff, covered with ornamental fabric, and held onto the head using something
other than a chin strap. When veils were worn, they were white or
cream, stiff, and usually nearly transparent. You never see the hair.
The "butterfly" type seems to be based on the truncated-cone shape, rather
than the full pointy version -- there are some illustrations where you
can see the end of the truncated cone through the veiling, but I have not
yet seen one that shows a full cone through the veils.