Reticulated means "looking or being like a net, or wire network."
This construction method is what many call "conjecturally period." That is to say: we have some wire framed things that the archeologists have dug up. We think they're hat-related. This technology was easily available to the medieval folks. It gives the right shape and look.
I've webbed another page which examines other semi-rigid
headresses for this time period; you might want to read it as well.
It has some good close-up detail pictures applicable to this type of hat.
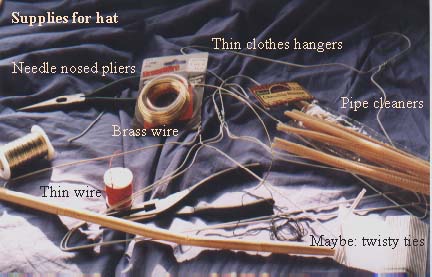 These
hats can be a lot of fun. You'll need the following supplies -- most pictured
at left; click on the little pictures in this page to see larger photos.
These
hats can be a lot of fun. You'll need the following supplies -- most pictured
at left; click on the little pictures in this page to see larger photos.
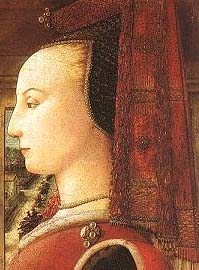
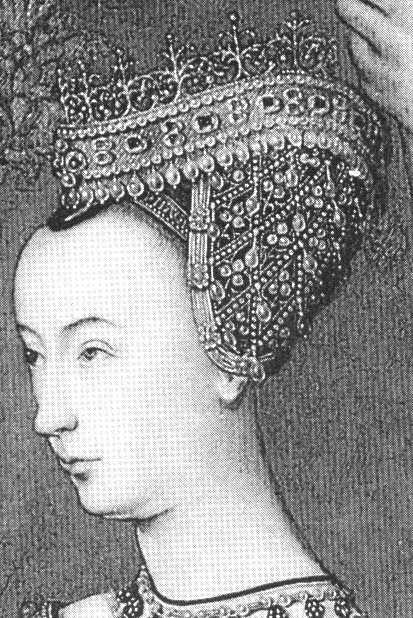
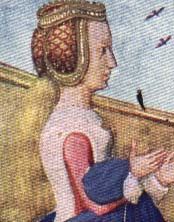
Inspiration pictures!
Note that the first one, thre is a stuffed roll on top, and skirting
or dags hanging off the back. The second has a stand up band with
a crown. The third has the same, and the fourth is from a sculpture
and it's clear that the net effect goes all the way around the head.
It was more clear in person.

 Using the pipe cleaners: What you do with these, is you make a draft of
your headdress shape. It's easy to work with, and you can put it on, make
sure it looks good with your face. Then, when it's perfect, you can measure
all the bits and angles and use it as a "pattern" to make your real wire
frame.
Using the pipe cleaners: What you do with these, is you make a draft of
your headdress shape. It's easy to work with, and you can put it on, make
sure it looks good with your face. Then, when it's perfect, you can measure
all the bits and angles and use it as a "pattern" to make your real wire
frame.
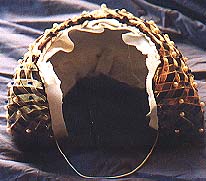
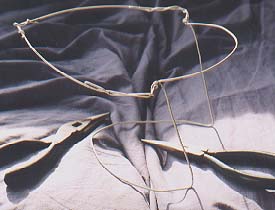 The
coathanger wire is used for the true perimeter of the frame -- the areas
that must not, can not, bend except very slightly. The picture shows that
the coathanger wire (white) goes around the top crown of the hat, and along
the temples, down to the bit that circles around the back of the neck.
The
coathanger wire is used for the true perimeter of the frame -- the areas
that must not, can not, bend except very slightly. The picture shows that
the coathanger wire (white) goes around the top crown of the hat, and along
the temples, down to the bit that circles around the back of the neck.
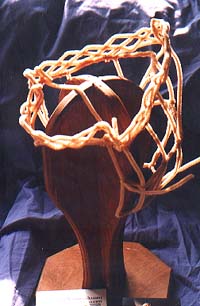
Onto this base, you put in your brass wire framework. Brass is easy to cut, soft to work, and cheap. Then you tie down the frame with thinner wire, making sure that it can't slide up or down, or along the coathanger wire like some kind of strange bead.
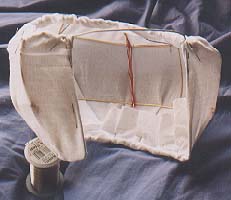 Next,
you cover this basic framework with muslin or other inexpensive fabric
-- on the outside. Tack or baste it down with thread, making folds and
darts as needed. It needs to be tight, like a tent over a framework.
Next,
you cover this basic framework with muslin or other inexpensive fabric
-- on the outside. Tack or baste it down with thread, making folds and
darts as needed. It needs to be tight, like a tent over a framework.
Take your layer of padding (in this case I used cotton quilt padding, but squares of heavy wool would work well also) cut it into small pieces to fit between the wire sections (squares, triangles, etc) and tack it to the muslin. The padding is there so that you can't see the wire framework when the piece is finished. If you are in a hurry, you could try having the padding be all one piece instead of just filling in the areas between the wires. The idea is to make it nearly impossible to see the ribs or framework of the hat, once the covering is on.
Cover this with the fabric that will be the under-ground of your netting - that will show through the net strips. If you use a stretchy material, such as wool, you won't need to make any folds or darts if you're clever about it. Tack this down, but only at the edges, where it will not be seen when you finish the hat. This version is brown wool.
Mount your mesh on the form. I made a mesh out of gold wired ribbon, because it didn't look as mylar-ish as the soutache braid that I would have used otherwise. Try to make it even. If you are doing embroidery for the mesh-appearance, and adding other embellishments, this is the time to do them, when the "ground" fabric is attached to the form.
Sew on beads at the intersections of the mesh. You can also get fancy and sew all kinds of other decorations on, as long as they are grid-based. Follow your inspiration pictures! The ones on this hat are good-quality fake pearls, and blue glass beads.
Line the inside of the hat. This will cover the brass framework, and
the random stitching from the beads.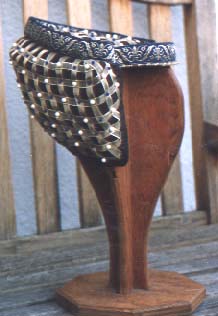
Finish off the perimeter edges. I used bias tape. I'll be putting additional beads around the perimeter, as we see in many paintings (see the enlargements on the Arnolfini page.)
Make whatever shape you need to to close over the top of the form. In my case, I made a shaped, netted piece, which ended up in a fat arrowhead shape. I finished this on all sides, like a pillow cover without stuffing, and basted it into the opening. You might not need this if you opt for the stuffed roll and skirts or liripipe.
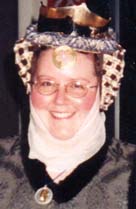
My inspiration pictures are of ladies who have crowns; since I was not eligible for a crown at the time I made this, I added a wired, two-sided band of ribbon trim to the top that completes the shape, without actually being a crown. When the King made me a Court Baronness, the brass coronet that he made for me miraculously fits inside this band -- see the picture of me at the top of this page. I often wear this with a silk gauze wimple, but that is an option, not a requirement.
The biggest suggestion I can give you during the construction process is: Don't forget to check it occasionally to make sure that you haven't made it too small or too large by your sewing or by mashing the wire around too much. Keep putting it on, and taking it off. You might want to wear it around the house for half an hour after the wireframe is all done, to see if there are any pressure points that you need to adjust.
This construction method should work for any wire-framed headdress,
whatever the shape.
| All material (c) 1999 Cynthia Virtue | Email Author with comments |
| Back to Virtue Ventures Main Page | Back to Article Index |