A theory on construction of the Houppelande:
Cynthia Virtue's rotated-corner,
circle plan houppelande
Note that there are many
pictures, which will take a while to load. Most small pictures
link to larger versions.
by Cynthia du Pré Argent
© 2000 Cynthia Virtue
Introduction
This is a summary of work on a rotated-corner full-circle plan
houppelande, as sent to the Historic Costume email list. I
discussed this theory with them in the summer of 1998, and then
constructed the black and red houppelande to test the pattern. In
late
winter of 2000, I made a men's version for my husband. In
the autumn of 2001, I made one for
myself.
I am proud of my hypothesis about the houppelande
construction; it
is original work. The best thing though, is that it looks like it
is
supposed to! It is not
the same idea as the traditional circle houppelande which is like a
circle with a hole cut in it for the head.
This is a long page. You may want to jump to:
|
|
Medieval Sources
Any theory is only as good as the results produced from it, so here are
versions of the medieval artworks that informed their construction, and
photos of the garments I made. Some of the images in the table
link to larger versions.
Medieval sources
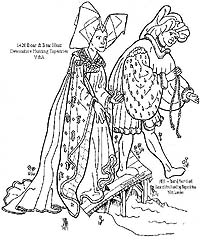
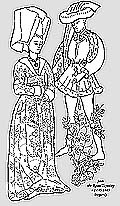
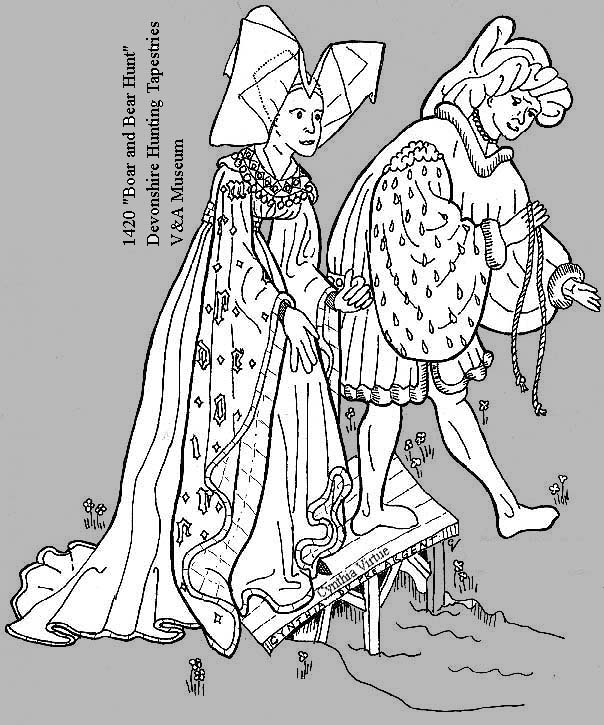
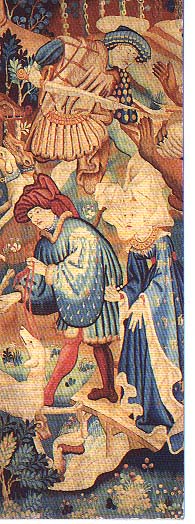
| Man and woman, drawn from the Devonshire Hunting Tapestries,
1420. Note how full the hem of the man's garment is, and how his
belt hovers around his hips. Magically. Note the V neck in
front, edged with fur like the hem. Here's a picture of the orginal
tapestry section, showing three people with one decorated sleeve. (Unless
the guy in the background has a decorated hood; I can't tell.) |
 |
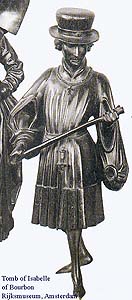
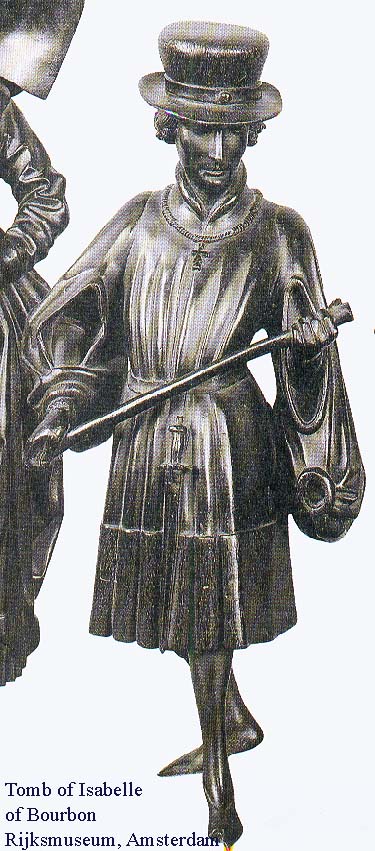
| Albert of Bavaria, from the tomb of Isabella of Bourbon
(these statues were formerly identified as "the Dam chimneypiece" |
 |
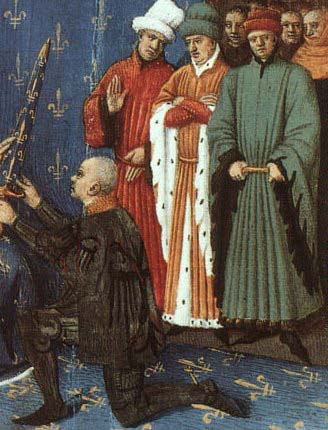
| Men at a ceremony; note that the pleats run from the waist to
the shoulders, not toward the neck |
 |
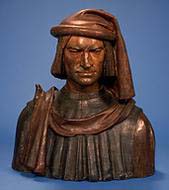
| Lorenzo de Medici; his pleats do seem to go toward the neck. |
 |
| Servers of high rank. Note the V neck in back, with the
pourpoint collar showing above it. |
 |
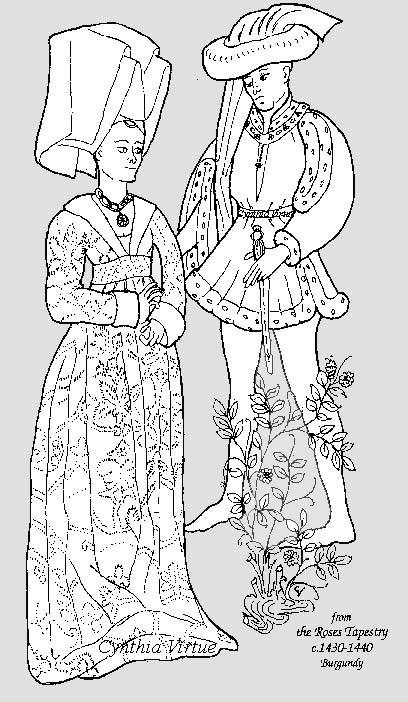
| Another tracing, this one from The Roses Tapesty |
 |
Garments
The garments I've made
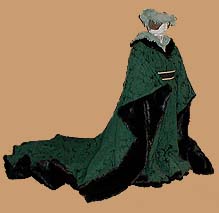
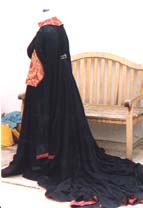
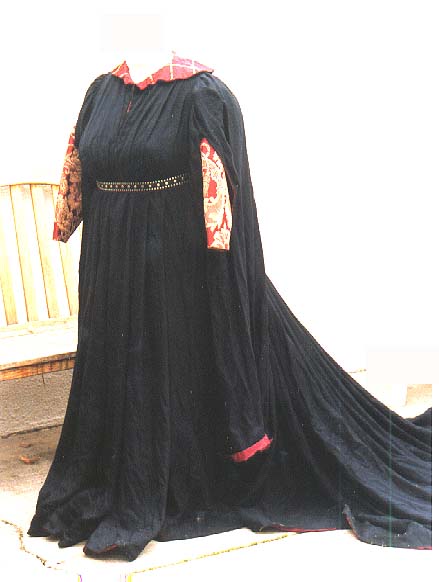
| First draft women's houp. Another one will be along
shortly in green wool challis. View of this black one, from the front. |
 |
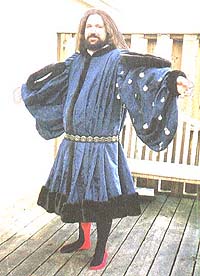
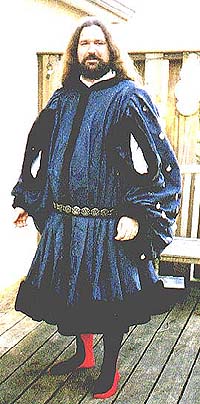
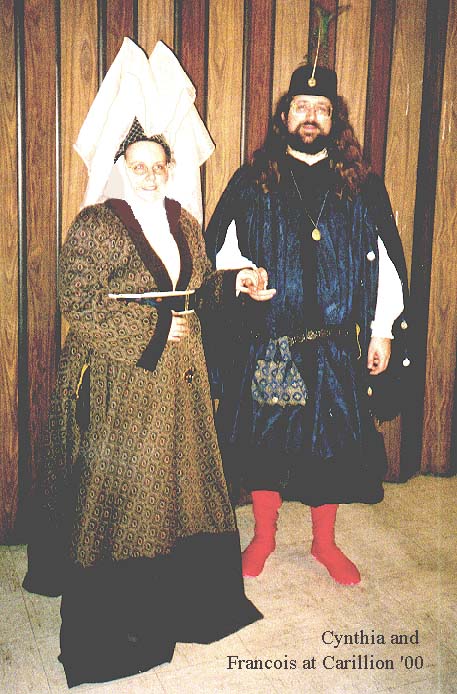
Houp for my husband, Lord Francois Thibault.
Wrist openings and slit sleeve.
Blue cotton damask, edged with brown false fur (like the sort that Gund
uses; very pettable.)
Silver colored mounts on one sleeve only; belt loops to hold up belt
magically at hips.
Hook tape to fasten center front.
Hem is about 9 yards; the whole garment used 10 yards of 54"
fabric. It weighs about 10 pounds, but as all the weight is
spread across the shoulders, he reports that it is very comfy.
These are not the normal hose. |
 |
| Another view. Note that pleats in the body head toward
shoulders. |
|
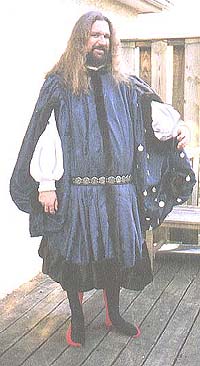
| Arms through the slits, this time. He should have a
pourpoint over his shirt, but I haven't made him one yet. |
 |
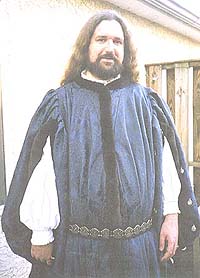
| Closer view. Note the V-neck seam in the larger version
-- this is the edge of the selvedge of the quarter-circle. |
 |
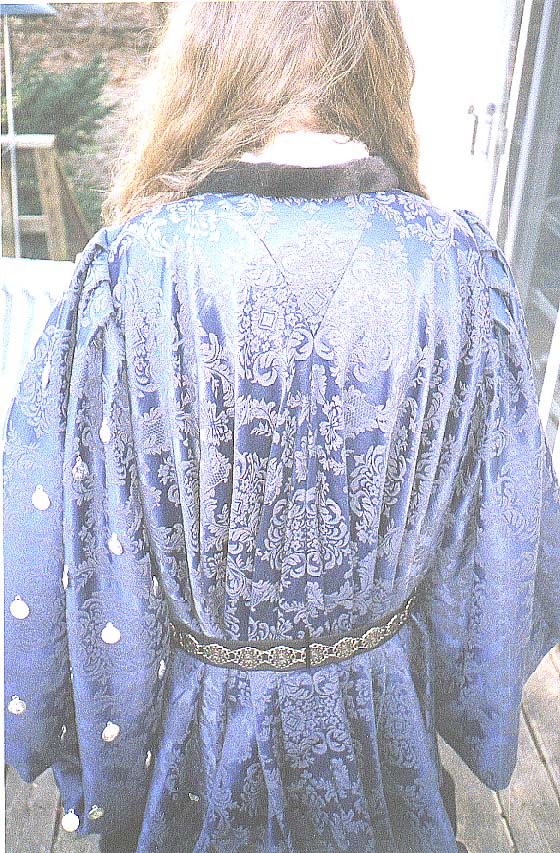
| Back view of V-neck portion, and nice pleats. Pleats
are only tacked down to a ribbon at belt level; this is a natural lie
over the top of his back. |
 |
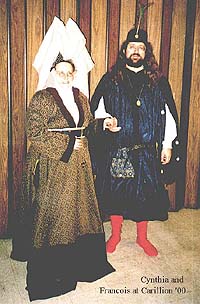
| Both of us at a recent event 3/00. My houp is not of
this plan; the butterfly hat finally
makes
me taller than him!. To get the "no shoe" effect from the
medieval pictures, we dyed white canvas slippers to match his hosen. |
 |
Common Houppelande Theories
As far as I, and I believe others on this list know, there are no
extant houppelandes. Nor any pattern books nor tailor's notes nor
household accounts from the time (15th century) that discuss
construction. I'd love to hear any leads for either of
these. [There is a "robe of Charles the Bold" from 1476, which
has a close fitted upper body connected to a gathered, pieced "skirt"
but this is more in keeping with the later women's "Burgundian"
houppelande style. A 16th century Tailor's Book has a Doctors'
Robe that has a partial-circle construction.]
Given that, there are a lot of theories about how they really did
it. The
pattern that we see most often is like a modern dress; relatively
closely cut neck, shoulder and arm, and then a wide angle going to the
hemline from under the arm. The trouble with this is that many of
the illustrations show fullness/pleats pointing toward the shoulder
line, and this does not give that effect; at best, the pleats head
toward the neck.. For example, I think Hunnisett's version gets
pleats headed in the direction of the shoulders, but they lose fullness
too soon to make it past the breasts. (There may well have been
several methods of cutting these, and in my opinion, if you can get
lots of pleats out of it at the bust and waist, without having the
pleats reach the shoulder seam, you're on the right track.)
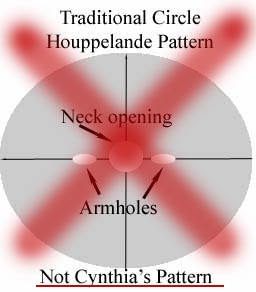
Another option is diagrammed on the right; the circle houp with a
hole for the head.
Another theory is that, like the earlier tunics, the fullness was
made entirely by a multitude of triangular gores. If these gores
started above the bust, the fullness would of course extend in the
direction of the cut for the gores. But what ultimate shape to
aim for? One like a modern dress? Or something else?
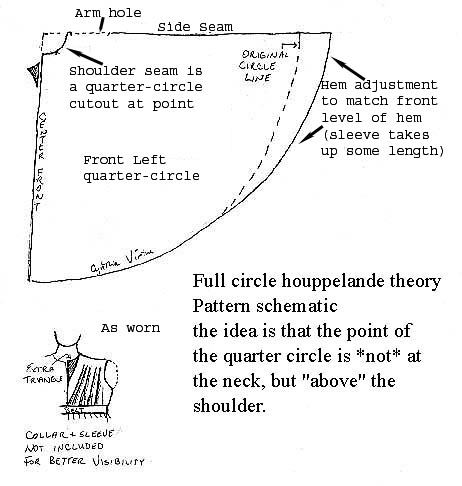
A New Theory: Cynthia's rotated-point quarter
circle
My theory that I tested is that some versions
of the houppelande were made with 4 quarter-circle panels, like a
pieced circle skirt -- but that the "center" curve of the panel was at
the shoulder seam, not at the neck.
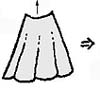
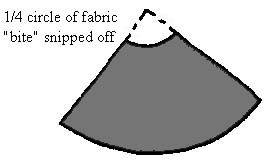
| Think of a woman's circle-cut skirt. It is often made
of four panels, each a quarter circle, with a curved "bite" cut out of
the top, where it attaches to the waistband. |
 Click
on all of these to get larger, readable versions. Click
on all of these to get larger, readable versions. |
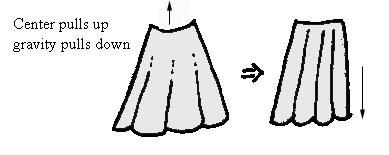
| The folds of the full skirt head toward the waistband,
because it is there that the center of the piece of fabric is lifted up
relative to the rest of the fabric. The folds go towards the
straightened curve. |
 |
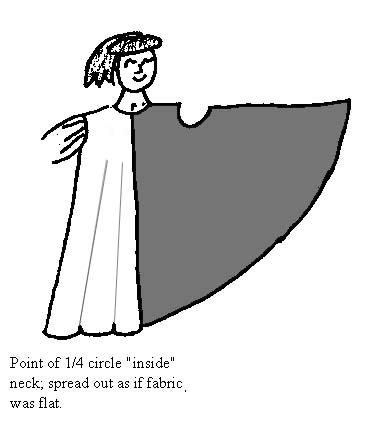
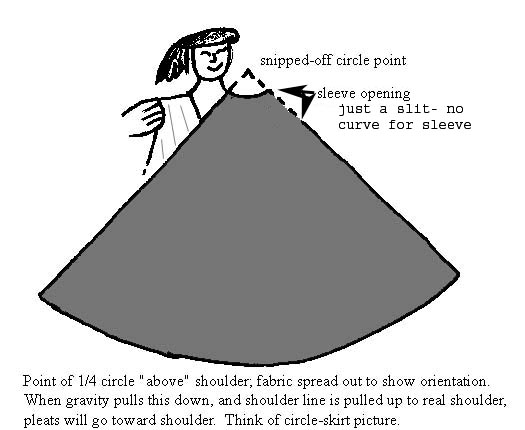
| Now consider a full-circle houppelande with the center of the
circle at the neck. (But with that same curve cut out, like for a
circle skirt.) The folds will either head toward the neck, or
they won't really be there at all, because the fabric has not been
pulled up to create the stress lines that are reflected in what we see
as folds. This version does produce a lot of fullness at the hem
(good) but doesn't explain the V-necks we see in most pictures (bad.) |
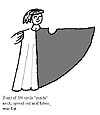 (Not CV's) (Not CV's)
|
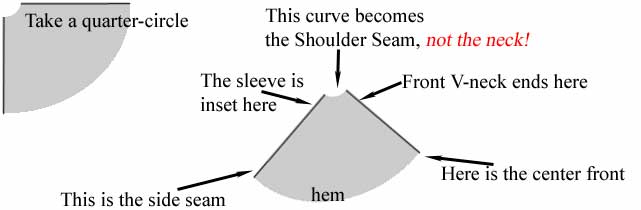
So where do we want our pleats to go? Toward the
shoulder. How do we get them going there? By "pulling up"
fabric into a line perpendicular to gravity. What's the closest
thing to a perpendicular line at the top of a human? The
shoulder. The curved "bite" of the quarter-circle panel that is
similar to the waistline of a circle skirt, becomes the shoulder
seam. This makes the selvedges run from the side of the neck to
points on the center front and center back of the garment. (See the
detail photos above.)
NOTE: I now think there is not
supposed to be any cut-out for the sleeve. It just gets set in, blind.
|
 |
So how do you cut this all out? It's fairly
simple, once you understand the method.
What really
helps: Do it for a doll first!
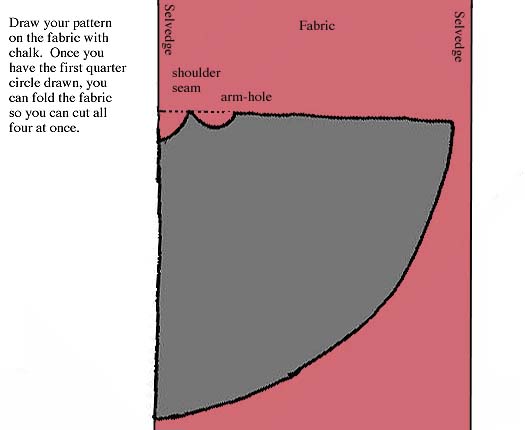
Graph your needed measurments (primary one being the
radius, which is equal to your shoulder-to-hem desired length, plus
whatever hem you want) onto your fabric with a piece of dressmaker's
chalk. As noted here, the CF and CB seams are on the
selvedge. This allows for a train, and for extra distance going
over busts or tummies. If you need more room sideways, join
fabric together parallel to the selvedge. If you're not certain,
cut it out of cheap fabric first and check the drape and hem.
Once you're satisfied, you can cut all four out at once. Then you
just need the triangle inserts (next diagram) for the front and back,
and your sleeves. If you want a train (and some of the women's
did
have longer back sections,) be sure to graph that out before
cutting! When it's put together, belt it in, arrange your pleats
and have someone mark the true hem for you.
NOTE: I've had some problems
with little pointy bits at the outside of the shoulder. This is
solved by having only a slit for the hole for the sleeve, instead of a
curved bite as shown in the tiny diagrams -- I've corrected the large
ones that these link to. More images will be coming soon.
|
 Don't forget to click on these tiny
thumbnails to get the larger schematics! Don't forget to click on these tiny
thumbnails to get the larger schematics! |
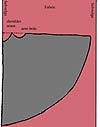
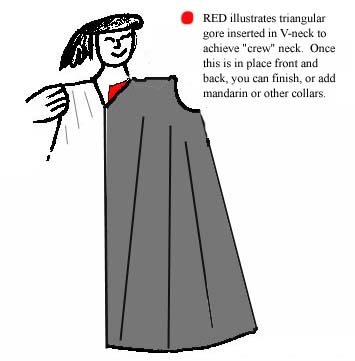
| Diagram of the triangular sections that are inserted along
the center front and center back, to bring the neckline up to "crew
neck" level. NOTE that these should probably be larger than the
one pictured here. The triangle in front on my newest houp seemed
to be more graceful if it was about a foot tall from neck to mid-chest,
and in back, about 9". See the pictures of the blue man's houp
for proportion. |
 |
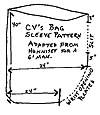
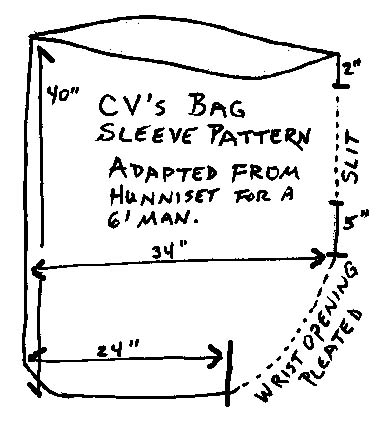
| Here's the sleeve pattern for the man's houp; it is based on Hunnisett's bag sleeve, but with two
major changes. See this subsidiary page about bad bag-sleeve patterns. |
 |
Here's the former schematic
from the first version of this page.
Theory in Practice
This worked to produce narrowing fullness that pointed at the shoulder
line. It also produced some unexpected interesting things.
On men's full outer garments from this period, there is sometimes a
very obvious v-necked seam
across the upper back. The theorized pattern requires a v-necked
seam across the upper back, because the long side of the panels part
ways with each other mid-upper-back, as they head toward the shoulder.
There is the same effect in the front, to a lesser degree. This V
may exist in women's garments, but we rarely see them from the
back. When we do, usually the hair or the hat hides the back of
the neck area. As constructed, there is plenty of fabric to pleat under
the belt (appx. 4 yards) and a hem circumference that is enormous!
If the houppelande had been done with the center curve of the panel
at the neck (instead of at the shoulder), these triangular insets would
not be needed. It is possible that a cut-out second curve on the side
of
the panel at the shoulder line (in the neck-center-point houp) would
re-direct the fullness to the shoulder. I haven't tried that yet.
Hemming: It is
critical to adjust the hemline when the houp it is on the body (or a
dress dummy) after it is nearly completed, and with a belt and
pleats/folds where they are expected. The final hem should be at
the same height all around (unless there is a train for women).
This will require measuring with a yardstick from the ground in the
classic manner, and trimming off some fabric. Women who are
making the houp longer than the ground (mine tend to be a foot longer
than where it hits the ground) will need to stand on something fairly
high while someone else measures the hem.
The hemline is huge! The women's version is a lot of fun to
wear, and we don't have to sweep the hall after an event anymore.
My sweetie said "I finally feel like a real medieval nobleman!"
Other Style Considerations
These houppelandes were done in the style of the Devonshire Hunting
Tapestries. There are some key points that are often missed when
doing a houppelande; if you take just a little care, they'll look
better/more like the sources.
- Fabric choice. A
Houppelande is all about luxurious fabric. Do not bead it.
Do not sew on ribbon type trim. Choose the best fabric you
can, (the modern fabric page and the extant garments page might help you) and even
if
it is cotton poplin, be sure to have plenty of it, in a good strong
color. Some embroidery is appropriate, or decoration on one sleeve with metal shiny bits,
called bezants.
- Belt location & pleats
It is important to put your belt at the right level, or else you
don't get the medieval look. For women, this means just under the
bust -- where the lower band of your bra sits. Men, usually the
waist or a slightly dropped-waist location. The blue man's houp
has black beltloops to keep it in the right spot. Use your
fingers to pleat the fabric under the belt before tightening it all the
way; the belt keeps the pleats in place.
- You're not dressed without a hat.
Other notes on these particular houps:
For the women's, a Peter-pan-like collar, hanging oversleeves to the
knee with a slit in them at about elbow height for the arms to go
through, long train (although at about 3' long, shorter than those in
the tapestries.)
Because the fabric that I did the first version in was cheap and not
very thick (the black with red), the train tends to fold over
itself as it is worn around, but my friends had a lot of fun
pulling it out and arranging it to drape nicely. It was a draft
dress, after all. It's black; the collar and sleeve linings are a
red/gold lattice pattern, and there is a red band at the hem of the
sleeves and the skirt, to imitate a full red lining.
For the man's, I used a cotton damask with about as much body as
chino slacks. The brown fur trim was a fancy fake fur; the
bezants were obtained from The Pillaged Village, and were intended for
middle-eastern bellydance outfits. They look much like the
various mounts dug up from England.
Future Investigations
The fabric was also very wide (60"), so I did not need to piece the
panels. It could be done more plausibly with gores, although there is
some evidence that wider silks were imported from Italy during this
time. A wide fabric would make it easy to do quarter-circle
panels.
One of these days I'm going to sit down with all my pictures of
patterned houppelandes and see if the patterns in the fabric themselves
give any hints as to the orientation of the pattern pieces on the
fabric yardage. This might help with construction questions, IF
the painters were painting from real examples, and replicated the
patterns as they were, not just as artistic license.
Here are some ideas for storing these
heavy garments.
See my further reading page for
some of my picture and text sources.


